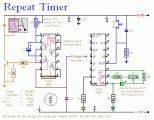
Time is set by potentiometer R2 which provides a range or 1 sec. To 100 seconds with timing capacitor C1 of 100uF. The output at pin 3 is normally low and the relay is held off. A momentary push on switch S1 energies the relay which is held closed for a time 1.1 X (R1+R2). C1 and then released. The exact length of the timing interval will depend on the actual capacitance of C1. Most electrolytic capacitors are rated on the basis of minimum guaranteed value and the actual value may be higher. The circuit should be calibrated for various positions of the control knob of R2 after the timing capacitor has had a chance to age. Once the capacitor has reached its stable value, the timings provided should be well within the photographic requirements.
Parts
C1 - 100uF, 25V electrolytic
C2 - 0.01uF, disc ceramic
D1, D2 - DR50 or 1N4001
R!,R2 - 10K ohms, ¼ watts
R3 - 1 M ohms, potentiometer
RLY1 - 12V, DC relay, operating current less than 200mA
S1 - Push-to-on switch
U1 - NE555 timer IC
P1 & P2 are for exposure lamp ckt.
Author: Ravi Sumithraarachchi
Email: ravi@ualink.lk
Website: http://www.electronics-lab.com

 Audio
Audio


